

Art Centres
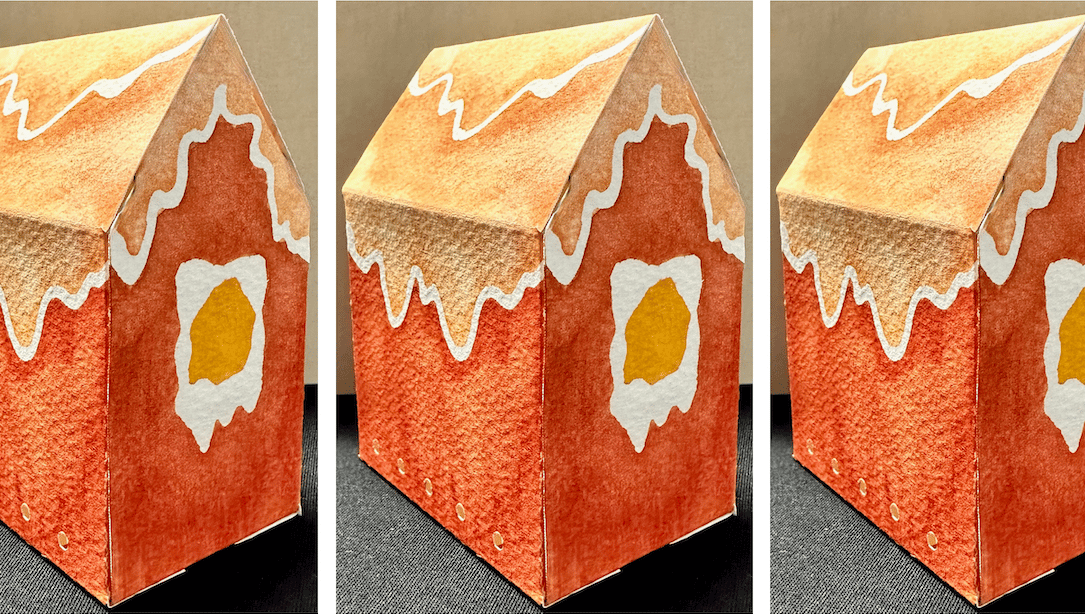
Watercolor Gingerbread House
Making paper crafts for the holidays is usually enjoyable for the whole family; add extra special touches with watercolor and Masking Fluid. You can add as much (or as little) detail as you'd like to this gingerbread house. This is a simple idea that even seasoned watercolorists will like. The houses make adorable place holders for your holiday table. You can also poke a few holes in them and insert a battery-operated tea light to turn them into miniature dwellings for your tabletop village.
1. Print the template for the gingerbread home on a piece of plain copy paper, then cut along the solid lines. Where you will eventually fold the paper is shown by the dotted lines. Before transferring it onto stronger watercolor paper, practice folding it into the shape of a house on a sheet of copy paper. In order to maintain white space, such as snow or the outlines surrounding doors and windows, unfold it flat and test your design in pencil. Then, determine where you will apply Masking Fluid.
2. Trace the outline of the house using the template on top of a piece of watercolor paper. Draw the fold lines with dashed lines using a light pencil. Pick the appropriate applicator tip from the bottle of masking fluid (there are 5 various sizes, for thin or thick lines) and apply as needed. Allow the liquid to dry entirely because as it dries, it will turn brown and become more noticeable against the white watercolor paper.
3. Select your color(s) for the first wash. We combined a little amount of Quinacridone Gold with Quinacridone Magenta (medium staining) (low staining). We used a damp paper towel to blot and lift the majority of the color off the roof, inside the snow lines, while it was still wet.
4. After the first wash dried, we mass-toned the windows with Cadmium Yellow Medium Hue. The remainder of the home was then given a second, darker wash using the same combination of colors. We purposely left blossoms, drips, and brush strokes visible because they gave the house a wonderful texture. Before removing the masking fluid with your finger or a rubber cement pickup, let this totally dry.
5. After carefully scoring along all of the dashed fold lines (either on the painted side or the back side) with a ruler and bone folder tool, cut out the house with sharp scissors or a blade.
6. Before folding, write your guest's name on one side if you're using the homes as placeholders. In order for a battery-operated tea light to shine through, make a few holes wherever you'd like them to be. To shape the house, gently fold and press along the score lines. The tabs should be tucked inside and secured using double-sided tape or a hot glue gun.
Contact a member of XIN BOWEN Team right away for more details on our services.

Unique DIY Valentine's Day Card Making Techniques
Handmade with Love' Valentine's Day cards that are adorable
Due of Valentine's Day, hearts, chocolate, and flowers may be found everywhere at this time of year. You can think of some inventive methods to show them that you care, whether you're celebrating with your significant other, your girlfriends, or your family. The most crucial component of any good Valentine's present is conveying that you spent time and thought into making something special for your significant other. A handmade card is a traditional Valentine's Day gift suggestion. The ability to completely tailor a DIY Valentine's Day card to the preferences of your special someone makes it a one-of-a-kind present.
This is an opportunity to express your affection via art. Use their preferred colors or sketch their favorite items within the card. Two Valentine's Day card ideas that you can utilize to create sentimental presents for your loved ones are provided below. Please use this information as a starting point and feel free to modify it to suit your needs.
It's time to gather your art tools and set up your workspace because love is in the air and it's time to get making!
How to Make Valentine's Day Cards at Home
Heart-Shaped Card
Step 1: To begin, draw a heart using a pencil on a scrap of paper. Fold the paper in half, then draw the bottom half of a heart on it (make sure the heart will be able to fit on the card).
Step 2: Use scissors to cut out the heart form. Simply trim the borders till you have a heart that fits the card if it happens to be too large. Remember that you'll need a little breathing room around the heart.
Step 3: Trace the heart-shaped outline onto the card's back. Then, using a pencil, doodle some random swirls and forms inside the heart. After placing your card on the cutting mat, carefully cut out the designs you drew with a sharp craft knife.
Note: Preventing scrapes or scratches on your surface by cutting out the designs on the mat.
Step 4: After cutting out your design, put it aside. If there are any imperfections in the pattern, don't worry; a backing piece will be glued to the delicate design to hold it all together. Cut out a piece of paper that completely encloses the heart to serve as the backdrop.
Step 5: Use your preferred medium to draw a bright pattern on this different sheet of paper. Three different backing sheets were produced using Real Brush Pens, Watercolor Half-Pans, and EverBlend Ultra Markers. We painted with Real Brush Pens and Watercolor Half-Pans, adding salt and water to make amazing designs. We colored the sheet, then used a cotton swab dipped in rubbing alcohol to dab on various areas of the sheet to achieve the similar tie-dye effect with the EverBlends.
Step 6: Apply adhesive to the design's edges after letting the vibrant design entirely dry. After adhering the design to the card's front and back, allow the adhesive to dry completely. When everything has dried, close the card and have a look at the vibrant patterns that are visible behind your cut-out artwork.
Heart-shaped Postcard
Step 1: On a separate piece of paper, draw a little heart (you can fold the piece of paper in half to help). The tiny heart should be cut out and opened.
Step 2: Fold your cardstock after that. A bone folder can be used to help create a clean crease as you fold the page in half, "hot dog" style. You won't waste a whole sheet of cardstock if you only fold a quarter of the page. In this manner, you can utilize it in the future for another project!
Step 3: Trace your heart onto different colored cardstock, then cut the shapes out. Do not entirely flatten the paper; we want the heart to appear three-dimensional. Gently unfold the paper to show the heart.
Choose the type of pattern you want to employ with your folded hearts in step 4. You can arrange them in a cascade, like flowers, or just scatter them about like polka dots. We created a miniature balloon bouquet out of them. With a black EverBlend, draw a few lines that converge at the bottom to get this. To accommodate your heart balloons, be sure to allow space at the top.
Step 5: Take a chenille stem and wrap a small bow on it if you're making a balloon bouquet like us. To make it appear as though the lines are bound together, glue the bow to the intersection of all your lines.
Step 6: Apply hot glue along the heart's fold to the card to secure your tiny heart "balloons" to it. The folded border should be quickly adhered to the card; the entire heart should not be glued down. You can affix as many hearts as you want.
Step 7: Finish by adding a kind message inside, then take a moment to admire your lovely finished card.
For the best services, get in touch with XIN BOWEN Team.

Create a Valentine's Card on Your Own
There is nothing like handmade Valentine's Cards to express your love.
Since 1415, Valentine's Day cards have been exchanged and sent. Who doesn't enjoy receiving a card that expresses their feelings of love? This is why Valentine's cards have been a huge success since they first appeared. Making homemade Valentine's Day cards is a wonderful way to express your love for someone, despite how much fun it is to buy and mail them.
A labor of love and an easy method to express your affection for your darling is to make them a card for Valentine's Day. Additionally, handmade cards can be treasured treasures. We asked one of our artists to create this video because of that. You no longer need to be a competent cardmaker or a professional designer to create cards for everyone you care about. Additionally, you won't need many materials; all you'll need is some paper, felt, hot glue, scissors or a craft knife, and Arteza TwiMarkers.
Heart Step-by-Step Card
Here are some recommendations before you get started. First things first, especially for this craft, make sure to use heavyweight paper to build your card. The paper must be able to support the weight of the several little rolls of felt that will be adhered to the front of this card. Due to this, the artist in the video is working on 140lb (300 gsm), a type of paper known as "cardstock," watercolor paper.
The second recommendation is to read the instructions thoroughly before watching the video and creating the card. You'll be more ready for each new phase if you do this.
Step 1: Get the card ready
Cut your paper in half on one side. Use the ruler to locate the center while making sure the paper is horizontal in front of you. After that, make a tiny notch at this center location. Create a line from the notch down the middle of the paper by softly scoring it with the back of a craft knife or the tip of a pair of scissors. The fold line is here, and using it will make it much simpler to get a nice, even fold. Card is flattened after being folded.
Draw a big, bold heart lightly on the front of your card.
Step 2: Create the ribbon
To create a 6" long strip, take the 12" broad strip you removed from the side and cut it in half at the center. Then, fold each side inward so that it will stand upright when placed across the base of your heart.
Set it away for the time being; you'll need it later.
Step 3: Produce the felt rolls
Cut strips that are 3-6 inches long on a diagonal from each felt sheet. The top and bottom of each strip should be between 0.5 and 0.7 inches apart. The artist cut about 100 strips for this card.
TIP: Your roll will be larger if the strip is longer. Variate the lengths so that you have numerous rolls of various sizes while keeping this in mind.
Roll the strip up into a little spiral roll starting at the widest end. Roll it so that one side is flat and the other is slightly elevated. (They'll look like little cinnamon rolls.) Put a straight pin through it and hot glue the end to the roll to keep it closed. Wait about five minutes for it to dry. Remove the pin once it has dried completely.
HINT: Using a straight pin will also assist prevent hot glue burns on your fingertips.
Step 4: Put the card together
Once you've completed all of your tiny spirals, hot glue each one into your heart-shaped drawing. At this point, your creativity may truly shine! The artist did more than simply line them up, as you can see in the video. She filled the heart at random with objects of various sizes and hues. The correct size spiral was then used to fill in the gaps.
Step 5: Complete the card
Once the heart is entirely filled in, it's time to re-use the paper ribbon you previously made. In between the folded edges, jot a message. Be My Valentine was written by the artist, however you can insert any message.
TIP: If you dislike your handwriting, you can trace words made on your computer or obtain a free font from the internet.
Next, make tiny v-shaped cuts on the ends to give it the appearance of a ribbon banner. Glue the ribbon in place over the bottom of your heart.
Get in touch with XIN BOWEN Group right away if you need assistance during your making processes.

Drawing a Cherub
Cherubs appear in a wide range of artistic creations, traditionally most frequently in Greek and Roman works. Cherubs are known as angelic creatures that stand for sacramental love. Cherubs are thought to be the highest order of angels in heaven, putting them the closest to God. Cherubs are a symbol of passionate love outside of religious contexts; they probably emerge around February 14th each year. If you've studied art history or frequently visit museums, you're probably well-versed in the use of cherubs in works of art.
Let's make our own representations of these wonderful organisms now that we've acknowledged the classic imagery of cherubs in fine art.
Related Products:
1. Paint Bursh
2. Palettes
Drawing a cherub: 6 Steps
Step 1
Sketch a baby angel with wings in a cloud in a simple manner. To begin, make shapes that depict the head. To visualize the location of the face's centerline, first draw a circle, then add a few light marks. Draw vertical lines for the nose and lips in a light manner. Then make marks to indicate the position of the eyes. Draw the hands below the angel's head by first softly sketching two ovals with tiny circles inside of them. Add the contours of the fingers, hands, and arms after that. Add the wings and cloud formation after that.
Step 2
Your angel's head should have cheeks and an ear. Make the nose, mouth, and brows even more refined. If any regions want greater definition, tighten them. The angel's fingers and arms should have great details. A little additional baby fat should be applied to the angel's wrists. Before proceeding to the following stage, give the cloud in your sketch greater structure.
Step 3
Add formation and feathers to your angel's wings, and do your best to maintain symmetry in the wing's features. Next, give your angel a head of hair. To depict the natural flow and development pattern of hair, use brief, curving lines. At this point, spend some time defining the aspects of your angel's face. Once everything looks good, use an eraser to eliminate any extra lines or blemishes.
Step 4
It's time to use our Inkonic Fineliner Pens to bring your cherub to life! Create your light source first, and then use A121 (golden) to give your angel shadows. The upper right corner of your page is a good suggestion for the drawing's source of light. Create feather patterns that emanate from each feather's root using A143 (blue), to give your angel's feathers more depth. To add linework to the cloud, use the same hue very lightly and sparingly. Make sure to leave a highlight between the shadow and the outline when coloring the cloud; this will make the cloud look more lifelike.
Step 5
Outline your drawing using A102 (brown). Use this shade to enhance the shadows you currently have. Since this is the darkest hue, make every effort to use intentional line work to prevent mistakes from showing.
Step 6
By emphasizing shadows using A121 (golden), A143 (blue), and A102, you can increase the saturation of your design (brown). For seamless color transitions, make sure to leave a little amount of vacant space in the areas with the brightest highlights. A wonderfully lovely color scheme is produced by the contrast of the brown contour and shadows with the yellow and blue shading.
Contact the XIN BOWEN Team today for more details on our services.
How to prepare a travel watercolor palette
I enjoy traveling regardless of the weather, particularly so I can draw and paint outside only within our paint brushes and palette. Here are some ideas for how I get my palate ready for travel.
See how I organized my paint color selections in the image above. Design sure the colors are organized in whatever order makes the most sense to you when you make a little palette diagram. I suggest putting the pigment numbers in addition to the color names when creating paint. When you want to make new mixes, this is useful.
Make use of a folding lidded plastic pallet. I lightly clean it with a mild abrasive, like baking soda, to start. This cleans up any manufacturing leftovers and removes the slick surface from the mixing area. Make sure to rinse and dry completely. Here, you can see how the preparation improved the way the paint blends and mingles.
I choose a color for each well from my collection of paint bottles. Instead of adding little dots of paint, genuinely FILL the wells! Eventually, small quantities of paint may come off. Holding the tube over the well's deep end, move backwards toward the shallow end while applying pressure to the tube.
Allow the palette to remain open for a few days (longer in damp climates). I wet my thumb and press down in the center of each well as indicated above once the paint has dried and is no longer tacky. A little depression is made for the water as a result. I simply lightly mist the wells with fine water mist before painting.
I frequently travel to teach and paint. I always pack my palette (not the tubes) and brushes in my carry-on luggage because I never want to go to my destination and discover that my art tools have disappeared somewhere else without me. I haven't yet experienced a security issue at an airport.
A few days prior to your departure, make sure to replenish your palette as necessary with fresh paint and allow it to air dry so the color can solidify. When I get there, I spritz the paint wells with new water, insert a little sponge, and shut the palette for the night. The paints are once more vibrant and fresh the next day.
Now go outside and start painting!
Now that you are aware of this fact, get a quote for the best products and services from XIN BOWEN to meet all of your painting needs for your forthcoming project!

Small watercolor paintings make lovely cards in simple steps.
People adore receiving handcrafted gifts around the holidays! Create gorgeous cards for any occasion using your tiny watercolor studies and sketches. You can personalize them with rubber stamps or handwriting, package them in sets of four, and you'll have the ideal present for loved ones. With
Here are the key processes:
1. Go to your local stationery store and first get some regular greeting card envelopes.
2. Cut and fold card stock sheets so that they will fit into the envelopes. The front of the folded card may now be measured so that your artwork can be mounted and trimmed.
3. Take into account several card stock colors that could serve as a lovely frame for your artwork. Don't forget to put a little piece of plain white paper inside for the message section.
For the best services, get in touch with XIN BOWEN and we are happy to tell you more about us.

Coloring Book Gingerbread House
Making paper crafts for the holidays is usually enjoyable for the whole family; add extra special touches with watercolor brush and Masking Fluid. You can add as much (or as little) detail as you'd like to this gingerbread house. This is a simple idea that even seasoned watercolorists will like. The houses make adorable place holders for your holiday table. You can also poke a few holes in them and insert a battery-operated tea light to turn them into miniature dwellings for your tabletop village.
Step 1: On a piece of standard copy paper, print the gingerbread house template, and then cut along the solid lines. Where you will eventually fold the paper is shown by the dotted lines. Before transferring it onto stronger watercolor paper, practice folding it into the shape of a house on a sheet of copy paper. In order to maintain white space, such as snow or the outlines surrounding doors and windows, unfold it flat and test your design in pencil. Then, determine where you will apply Masking Fluid.
Step 2: Trace around the home using the template and a piece of watercolor paper. Draw the fold lines with dashed lines using a light pencil. Pick the appropriate applicator tip from the bottle of masking fluid (there are 5 various sizes, for thin or thick lines) and apply as needed. Allow the liquid to dry entirely because as it dries, it will turn brown and become more noticeable against the white watercolor paper.
Step 3: Select your color(s) for the first wash. We combined a little amount of Quinacridone Gold with Quinacridone Magenta (medium staining) (low staining). We used a damp paper towel to blot and lift the majority of the color off the roof, inside the snow lines, while it was still wet.
Step 4: We added some Cadmium Yellow Medium Hue (mass tone) inside the windows after the first wash had dried. The remainder of the home was then given a second, darker wash using the same combination of colors. We purposely left blossoms, drips, and brush strokes visible because they gave the house a wonderful texture. Before removing the masking fluid with your finger or a rubber cement pickup, let this totally dry.
Step 5: After carefully scoring along all of the dashed fold lines (either on the painted side or the back side) with a ruler and bone folder tool, cut out the house with sharp scissors or a blade.
Step 6: Write your guest's name on one side before folding if you're using the homes as placeholders. In order for a battery-operated tea light to shine through, make a few holes wherever you'd like them to be. To shape the house, gently fold and press along the score lines. The tabs should be tucked inside and secured using double-sided tape or a hot glue gun.
If you still have any questions, please just contact us today and leave your questions below.
Advice for enhancing your painting technique
I'd like to provide some really fundamental advice that will help you develop your painting technique and make sure your artistic endeavors are as successful and pleasurable as they can be. A well-organized workspace will prevent a great deal of possible problems in the future, allowing you to maximize your creative time.I'm aware that not everyone has the best workspaces, and some people (like myself at first) might be painting on the kitchen table before they have a dedicated workspace or studio. But here are what I believe to be the 10 requirements for a studio setup, wherever it may be:
1. Optimal natural lighting
If your room is windowless, think about investing in a day globe that replicates natural light (available at most art supply stores)
2. A table or workstation without clutter
Actually, doing this will help you avoid distractions. When you have to constantly move things around or tip things over that are in your way, it is difficult to freely create. It's wonderful to get off to a clean, new start.
3. An inclined surface
This might be an easel, drawing table, or support board for managing washes.
4. Water-holding devices
To keep colors clean, you need one for the first wash and another for the second rinse. Always change your water frequently. Set up your water and palette according to whether you are a right- or left-handed person so you are not reaching across your paper and running the risk of inadvertent drips.
5. Toilet paper and a sponge
It is practical to control correct brush loading and absorb surplus moisture.
6. Pallet
So that you don't have to keep mixing color midway through your wash, choose one with deep wells and many of mixing cells (or dishes). To make blending colors simple, I place the complementary colors across from one another on a circular palette (like the color wheel). Without having to concentrate about the names of colors while they are in motion, this setup enables you to learn the color wheel like a keyboard. Warm colors are on one side and cool hues on the other, keeping your colors ordered.
7. Painting brushes and tools
My watercolor brushes, which include flats, rounds, mops, and riggers, are a good blend of sables and synthetics. Every brush has a particular purpose. I also have practical medium and large cleaning brushes for removing color.
8. Bottle of fine mist spray
This is fantastic for flooding or fracturing color as well as wetting your palette to revive it.
9. Appropriate paper for the task
Since it can withstand the punishment I give it, I typically use 140 lb. rough-texture (cold press) watercolor paper. It can also tolerate extreme moisture and many of the mixed media techniques I employ. However, I would choose smooth (hot press) paper if your job involves lots of drawing and small details. In order to be able to tilt the surface when necessary, I typically utilize a pad in my studio and tape it to a timber or gator board. I use an adhesive block of paper for plein air painting so I don't have to bring a backing board or tape it down.
10. Paint
There are 16 hues of XIN BOWEN's watercolors that I use constantly. You can paint pretty much anything using this palette. It has a good balance of warms and cools, transparent, opaque, and semi-opaque materials.
To achieve color harmony when you're just starting off, it's a good idea to stick with a small color scheme. Later, you can begin experimenting with more scrumptious hues like Wisteria, Aussie Red Gold, and Lavender. Lunar Black is another one of my favorites because of its amazing "crazing" characteristics!
I believe that skimping on quality while buying these 10 needs leads to a false sense of savings, especially if you are just starting out. With low-quality paints and tools, you won't obtain the outcomes you're hoping for, and you'll be so frustrated. Please indulge and utilize the best resources you can for your upcoming works; watercolor can be difficult enough without adding subpar materials to the mix. You deserve it!
Contact us right away for further details.

Top 5 Artwork Books by the Masters
The masters are masters for a reason. They’ve mastered their craft and their work has stood the test of time. Gustav Klimt, Van Gogh, Picasso, Caravaggio, Da Vinci, Michelangelo, Monet, etc. You know these guys and know them well. Here we’ve curated the top 7 artwork books by the masters.
From the Italian Renaissance to Impressionism, to the Cubist Movement, we have books that will leave you awestruck. Perfect to flip through when you want to gain inspiration or to leave on your coffee table for when company comes by. With glossy thick paper and high-def pictures, these books will transport you straight to the museums where these masterpieces live.
So, come on, mentally pack your bags and take a trip – to a museum and to the past. And meet the masters.
1. Van Gogh: Complete Works by Rainer Metzger
One of the most significant artists of the 19th century today is Vincent van Gogh. Rumor has it that he only ever sold one artwork during his lifetime. His paintings remain despite difficulties and acclaim. You may now purchase them all in a single book.
2. Michelangelo: Complete Works XL by Frank Zollner
If Michelangelo is what you're looking for in XL, you've found him! This book's title says it all. It really is the full body of Michelangelo's sculpture, painting, and architectural achievements.
3. Gustav Klimt: Complete Paintings XL by Tobias Natter
This comprehensive collection in XL is the book for you if you enjoy Gustav Klimt. Your smile will be guaranteed by all of the great works by 19th-century Viennese masters, as well as by archival access, letters, and discussion.
4. Leonardo da Vinci: Complete Paintings and Drawings XL by Johannes Nathan
This ultimate XL collection is the best way to enjoy the great master da Vinci's works. This book, one of the most thorough compilations ever created, contains everything the great Leonardo has to offer.
5. Picasso by Picasso Dagen
The best Picasso coffee table book available is this one. Not simply because of its contents, but also because this book might be easily transformed into your new coffee table by adding legs.
We offer watercolor supplies at affordable prices. Please contact us to buy what you need.